Entering Common Transactions
These are the most common transactions you will enter each month. If the transaction you need to enter isn't included here, please see Chapter 6: Less-common Transaction Types
Checks and Other Payments
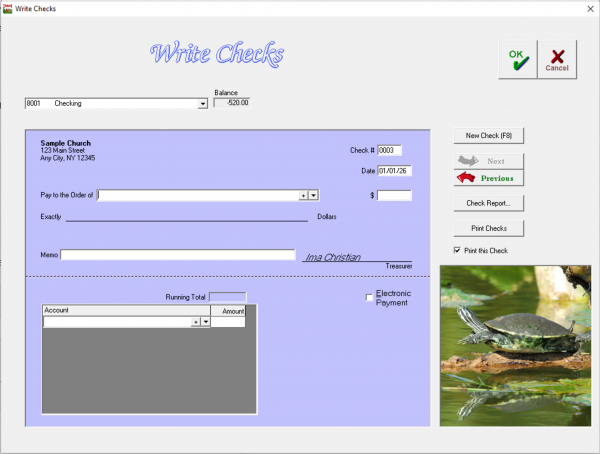
In Jewel, all payments are made in the Write Checks screen, whether you print a physical check with Jewel, hand-write a paper check, use a debit/credit card, or send an electronic payment. Checking the Electronic Payment box removes the Check Number field, so use that for anything that is not a paper check. Otherwise, fill out the check as usual. Note that the total check amount must equal the Running Total of the Accounts listed in the bottom portion of the check.
Checking the Print this Check box at the right means that the current check will be included the next time you click Print Checks. Whether this option is automatically checked or not can be toggled on and off in Maintenance -> Properties -> General tab.
Best practice is to enter all of your checks for the month before starting the month-end closing process. Doing this means that your Remittance check will be the last check written for the month, and that all checks will show on your Bank Reconciliation report. However, it is possible to enter checks at any time during the month, up until you Print Monthly Reports.
When you want to enter any type of payment, from your Jewel Home Screen, select "Write Checks".
- Verify that the church and bank information shown is correct. If not, correct it in Maintenance -> Properties -> Church Info tab
- The check number is automatic and you should not generally need to change it. If you are hand-writing checks or using pre-printed checks, verify that the check number matches the paper check you plan to use. If you are entering a non-check form of payment, check the Electronic Payment box. This removes the check number entirely.
- The date is automatically set to today's date, according to the date on your computer's system. You can also set Jewel so that it brings up the date of the last check written in Maintenance -> Properties -> General tab.
- Type in the Payee, or choose from the list using the down arrow. Remember you can use the (+) sign to add or edit a name and then return to writing your check.
- The dollar amount (as well as memo and account breakdown) of the most recent check written to this vendor will be automatically entered. If necessary, change this information to what you need THIS current check written for. After typing in the correct amount, press Enter.
- Enter a Memo in the memo text box, indicating what the check is being written for.
- Choose the Account(s) the check is to be taken from.
At this point, you can either print this check (ensure “Print this Check” is marked, then click “Print Checks”) or write more checks (click “New Check”, or press F8). You can print multiple checks by ensuring “Print this Check” is marked for each check, then clicking “Print Checks” when you are finished writing all your checks.
Important: If you still want to hand-write your checks, you can. But you MUST write the check in Jewel as well so that the check information can be stored and kept in Jewel's records. This is necessary to keep your books accurate and reliable!
Electronic Payments
Rather than writing a check, you may need to simply record that a payment has been made out of a church account, without using a check number. These payments are recorded in Write Checks, following the same steps as above, except that instead of making sure you have the right check number, you will mark the Electronic Payment box. Use this procedure for electronic bill pay, automatic debits, and credit/debit card transactions.
Transfer Funds
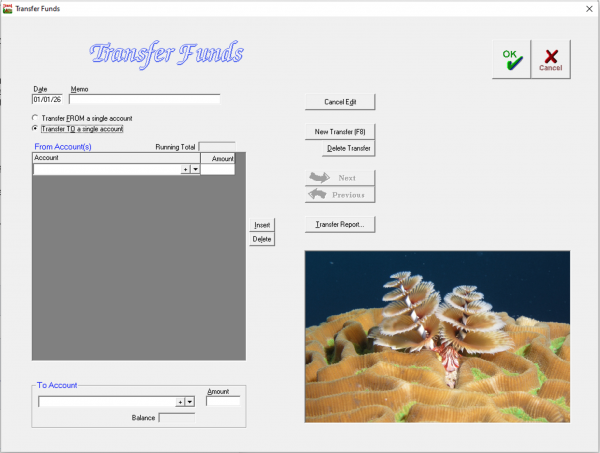
Jewel allows two types of transfers, both done in the Transfer Funds screen. You can transfer funds between two Bank Accounts, such as from checking to savings. Or you can (with Church Board approval) transfer funds between two Local Funds, such as from Church Budget to Utilities.
Best practice for transfers is to enter them before starting the month-end closing process, but they can be entered at any time during the month, up until you Print Monthly Reports.
To transfer funds in Jewel, follow these instructions:
- Click on Transfer Funds on the Home Screen.
- The date (in the upper left corner) defaults to today's date, but can be edited if needed. Use the Memo field to indicate the reason for the transfer, such as "Per Board vote on 5/17/26" or "To zero out at month end".
- You have the option to transfer in or out of multiple accounts. This is in case you need to take money from multiple funds to put into one OR take money from a single account and divide it among multiple funds. Select whichever method you would like to use by clicking the small white circle beside your preferred option. Notice how the screen changes when you select either one. It will expand the TO or FROM accounts so that you can enter multiple accounts. If you are making a transfer from a single account into a single account, it does not matter which of these is selected.
- Now, select the account(s) the money is being transferred out of - either by typing it in or selecting from a list with the down arrow. Then for each account type in how much money is to be transferred. To insert an account, either press ENTER after the previous account keyed in, OR click the insert button.
- Next, select the account(s) the money is being transferred in to and how much money is to be transferred in. The amount being transferred in must be the same as the amount you transferred out. You can't take $50 out and transfer in $60!
- When finished, click OK and you're done! Jewel will make the appropriate adjustments in the records.
Note that you can look at a record of previous transfers by clicking the "Transfer Report" button.
Void a Check
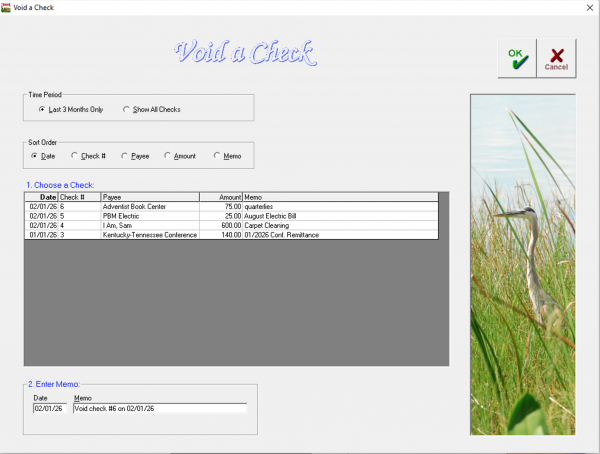
If you need to void a check that you have previously written, go to Accounting -> Void a Check.
- Use the sort options to find and select the check you wish to void.
- Verify that the date and memo accurately record what you are doing.
- Click OK.
- Verify the information in the pop-up, and click OK again.
The check you selected has been recorded as void. Jewel will either edit the check to make the amounts $0 (if the check is in the current month) or record a new transaction in the current month to cancel out the check that you're voiding. In the Bank Reconciliation, you will then mark off the $0 check, or both the original check and the new transaction, to remove them from the list of checks waiting to be cleared. Since the total amount you are checking off is $0, it will not affect your balance.
Returned Offerings
When an offering is returned for non-sufficient funds, because the donor changed their mind, or some other reason, use the NSF Check Reversal feature of Jewel. An NSF Check reversal can be performed at any time, even in months after the offering was received.
We say "check", because that's the type of offering that historically has most often "bounced", but electronic offerings can also be returned. All electronic offerings should be entered as "Checks" rather than as "Cash" so that if they are returned, you can use Jewel's NSF Check Reversal feature to easily reverse the offering.
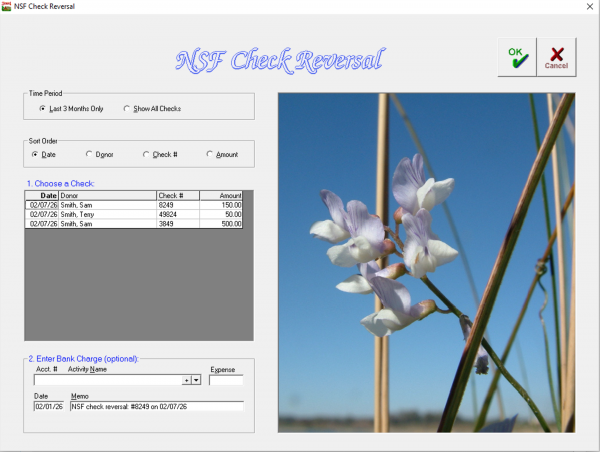
To record that an offering was reversed, go to Offerings -> NSF Check Reversal.
- Use the Time Period and Sort Order options to find the offering you need to reverse.
- Select the offering you are looking for. Make SURE you select the correct one!
- If your bank does not charge a fee, simply leave the Account and Expense boxes blank. If your bank has charged a fee for the NSF check, enter that information here. Select which account to take the charge from and enter the amount charged.
- Verify that the Date and Memo accurately record what you are doing.
- Click OK to complete the NSF check reversal.
Jewel will record a negative deposit which takes the money out of the bank, the person’s receipt, and the accounts donated to. If Conference Funds were involved and the month’s remittance was already paid, the funds will be automatically subtracted from the next month’s remittance.
AdventistGiving Offerings
AdventistGiving is an online giving platform designed specifically for Adventist churches. It's also free for churches to use. For information on how AdventistGiving works, and how to retrieve reports from their website, click here. Note that AdventistGiving is a separate organization from Jewel, so Jewel tech support cannot help you with problems using or setting up your information on their website.
Jewel can import offering information from AdventistGiving. You may, of course, manually type in AdventistGiving offerings just like you do your Sabbath offerings. If you have very few donors, this is not an undue burden. Just be sure that you copy from AdventistGiving's Official Deposit Report, issued after the 15th and last day of each month, and not the notifications of individual donations that you receive throughout the month. Use the Cut-off Date as the offering date, not the date the offering is deposited in your bank. According to IRS regulations, the donation date is when the donation was initiated by the donor, regardless of when it was deposited. Detailed manual entry instructions can be found here.
However, if you have more than a very few donations each month, you will find it much easier and faster to import your AdventistGiving offerings as described below.
Direct Import
The easiest method imports the most recent AdventistGiving Deposit Report. To use this method:
- Click Start New Offering, then Import Offering. You do not need to enter a date or offering total, as Jewel will receive this information from AdventistGiving.
- Enter the Email and Password that you use to log in to the AdventistGiving website, then click Import from AdventistGiving.
- Any accounts that appear in red must be "mapped". Select the account you wish to map and click Map Account. Select the Jewel account that corresponds to the AdventistGiving account you are mapping, or add a new Jewel account, then click OK. Click here for detailed mapping instructions.
- Any donors that appear in red must be mapped. Select the donor you wish to map and click Map Donor. Select the existing Jewel donor that corresponds to the AdventistGiving donor you are mapping, or add a new Jewel donor, then click OK. Click here for detailed mapping instructions.
- Once you don't see any more red, all accounts and donors have been mapped. Note that Jewel will remember all mappings for future imports, so this step will get significantly easier over time. Click OK to move on to the Make Deposit screen.
- Check that all deposit information looks correct, and click OK to record the deposit.
Detailed instructions can be found here.
Import from a File
If you need to import a Deposit Report that is not the most recent report, you will need to import from a file.
- Go to the AdventistGiving website, and log in to your Treasury account.
- Download the Official Deposit Report for the cut-off date you need to import. The .csv version works most consistently for Jewel import. Note where the file is saved on your computer.
- Back in Jewel, click Start New Offering, then Import Offering. You do not need to enter a date or offering total, as Jewel will receive this information from AdventistGiving.
- Click Import from a File. You do not need to enter your email or password.
- Find and select the Official Deposit Report you just downloaded, then click Open.
- Any accounts that appear in red must be "mapped". Select the account you wish to map and click Map Account. Select the Jewel account that corresponds to the AdventistGiving account you are mapping, or add a new Jewel account, then click OK. Click here for detailed mapping instructions.
- Any donors that appear in red must be mapped. Select the donor you wish to map and click Map Donor. Select the existing Jewel donor that corresponds to the AdventistGiving donor you are mapping, or add a new Jewel donor, then click OK. Click here for detailed mapping instructions.
- Once you don't see any more red, all accounts and donors have been mapped. Note that Jewel will remember all mappings for future imports, so this step will get significantly easier over time. Click OK to move on to the Make Deposit screen.
- Check that all deposit information looks correct, and click OK to record the deposit.
Detailed instructions can be found here.
Having trouble deciding which method to use?
Check out this comparison of the three entry methods.
Returned Offering from AdventistGiving
If you are importing your AdventistGiving offerings, either directly or via Import from a File, then you don't need to do anything. Jewel will automatically take care of the returned offering when you import your deposit report.
If you are entering your AdventistGiving offerings manually, you will enter a negative envelope for the returned offering, so that the offering total equals what is deposited in the bank. Detailed instructions can be found here.
If your transaction isn't listed here, go to Chapter 6: Less-common Transaction Types
Return to Chapter 3: The Basic Jewel Processes
Return to previous section: Receiving and Handling Offerings


