Getting Started: Difference between revisions
| (2 intermediate revisions by the same user not shown) | |||
| Line 145: | Line 145: | ||
=== Budget Allocations === | === Budget Allocations === | ||
If your church has voted on a budget, now is a great time to enter it. You may edit budget allocations at any time, but any additions or changes will only apply to unclosed months, not to previous months. So if you have a current budget, enter it before doing your month-end closing process. Please see [[Budget|Chapter 5: Budget]] for detailed instructions. | If your church has voted on a budget, now is a great time to enter it. You may edit budget allocations at any time, but any additions or changes will only apply to unclosed months, not to previous months. So if you have a current budget, enter it before doing your month-end closing process. Please see [[Budget|Chapter 5: Budget]] for detailed instructions. | ||
<br><br> | |||
----- | |||
[[What Does a Treasurer Do?|Return to Chapter 1: What Does a Treasurer Do?]] | |||
[[The Basic Jewel Processes|Continue to Chapter 3: The Basic Jewel Processes]] | |||
Latest revision as of 13:37, 11 November 2025
Now it's time to see how Jewel actually works! We hope you will find that Jewel makes your job as church treasurer easier, and perhaps even fun! Before we get into the actual processes you will be performing, let's find out what to expect Jewel to look like and how to find your way around. Then we'll get the application installed, and your database set up.
How to Get Help
Perhaps the most important question many of you may have at this point is, "So how do I get HELP?" You actually have lots of options.
Jewel Wiki
Congratulations! You've already found the most up-to-the-minute Jewel helps. The Jewel Wiki contains the updated version of the Jewel Handbook (an older version is available under Help in the Jewel program). This Handbook, and its accompanying articles, are meant to be a guide both as you are first learning Jewel, as well as later on if you need to reference back or get further information.
Jewel Helps
The easiest-to-access helps will be those built in to the Jewel program, reached by simply press F1 on your keyboard. This will take you to the helps applicable to whichever screen you happen to be on. For example, if you need further information about writing a check, simply go to Write Checks and hit F1. A new window will open, giving you detailed help about writing checks. The second way to access Help is by clicking the Help menu item on the Jewel Main Screen. Choosing either the Contents or the Index options will open up the help window where you can use the Table of Contents, Index, or Search to find the topic you need help with.
Tips
As you begin using Jewel, you will notice small dialog boxes with "Tips" popping up at various times. Pay special attention to each of these - at least the first time you see it! These dialog boxes give you tips regarding the particular step you are on in the process. Once you have read a Tip and know you will not need it again, click the box next to "Don't show this Tip again" located towards the bottom of the Tip dialog box. Again, don't ignore these tips - they will save you a lot of time in the long run!
Auditor/Tech Support
Another way for you to get help is through your conference auditor or, if your conference has contracted with us for tech support, directly from Jewel. Please be sure to check this handbook for answers to your question BEFORE calling your auditor/tech support. This will save time both for you and your support. You can contact Jewel's tech support via phone at 352-326-0093 (English) or 352-535-0093 (Spanish), or via email (both languages) at support@jewelsda.com. Conference contact information can usually be found on the website on the Auditing or Treasury department page.
Menu Bar
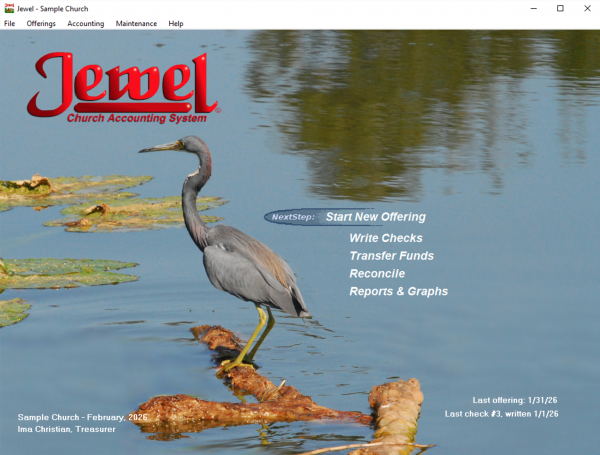
This menu is located across the very top of the window, with the items File, Offerings, Accounting, Maintenance, and Help. Click on each of these menus and notice the drop-down menus with many more options available to you. You can use these menus to access everything you need in Jewel.
Quick Links
The processes you will be using the most, NextStep, Write Checks, Transfer Funds, Reconcile, and Reports & Graphs, are listed in the middle of Jewel's Home Screen. They have been placed here for quick and easy access. Simply click, and the desired screen will open.
NextStep Button
The NextStep button at the top of the Quick Links list is one of the features that sets Jewel apart from other accounting software. This button will guide you through the entire accounting process - all the way from entering offerings to closing out the year. The NextStep button changes according to where you are in the monthly and yearly cycle, telling you exactly what your next step should be.
Common Buttons
Following is an explanation of various buttons and icons you will be seeing throughout Jewel:
This button is located in the top right corner of virtually every screen in Jewel. Click this button either when you are through viewing the screen (such as a Tip) or when you are finished entering your data (i.e. Write Checks, Contribution Entry). Clicking OK indicates that you are done with a particular process and would like to save the changes you have made. Clicking OK on a NextStep process will let the NextStep move to the next process in the accounting cycle.
Use this button to cancel the process you are working on. But be careful! Only click this button if you intend to lose the information you have just keyed in (the exception to this is the Bank Reconciliation, which gives an option to save your work when cancelling). This button is useful if you have perhaps entered something incorrectly and just want to start over. When you click Cancel on a NextStep process, that process will remain at the NextStep until you have completed it and clicked OK.
Click this button to close the window you are in, such as on a reports screen. You will also see the Close button in Contribution Entry. Note that your changes will NOT be lost by clicking Close. The NextStep button will bring you right back to the envelope where you left off.
Click this button to print the report, check, or any other screen you would like to print. Please make sure your printer is plugged in and with the appropriate paper loaded in the printer before clicking this button. On the reports screens, you may also select how many copies of the report you would like to print.
You will find this symbol located to the right of data entry fields, such as in the Donor Name box in Contribution Entry. This symbol is a quick way to add a new name or account, depending on which field it is located on. Simply click the (+) button and you will be taken to either Edit Names or Edit Accounts, where you can add a new name or account. When you close the Edit Names/Accounts screen, you will be taken right back to where you were when you clicked the (+). Note that, instead of clicking (+), you may also type the full new name or account directly in the text box and press ENTER on the keyboard to get to Edit Names/Accounts.
This symbol is located beside fields for the selection of a name, account, etc. Clicking on the down arrow will open a drop down menu showing all of the options to choose from. When looking at the drop down menus for names and accounts, you will notice that they are listed both with and without the ID number attached. This is intentional, so that you can search by either ID number or alphabetically, whichever is more convenient. Or, instead of using the down arrow, you may just begin typing the ID number, name, or account in the text box. As you type, the program will find matches for what you are keying in. When the desired name/account appears, click Enter. Use whichever method is convenient for you.
Installation
Double-click on the Jewel Install file you have received. Once the Jewel Setup screen has appeared, follow the prompts to complete installation.
Sometimes antivirus software interferes with the download or installation of Jewel. If this is the case, you may need to click "run anyway", "keep", "see more" or similar to tell the antivirus software that you trust Jewel. Or you may need to temporarily disable the antivirus software while you complete the installation.
At this point, if you have already been using Jewel, you can now continue working where you left off in your old version. The same database you have been using will automatically open after your installation of Jewel. You do not need to go through the Setup process. If you are starting new, continue with the following setup instructions.
Setting Up Your Database
After installing Jewel, you will enter some basic information about your church. You will need (from your existing financial records) a balance sheet showing the ending balances of all church accounts.
Church Name
Your first step in setting up Jewel is to tell it who you are! Enter your church name, as you would like it to appear on printed reports, checks, and receipts. This name will also be used by tech support and conference auditors to identify your database, so including your location is helpful (ex: "Anytown New Life SDA Church" instead of just "New Life SDA Church").
Add Accounts
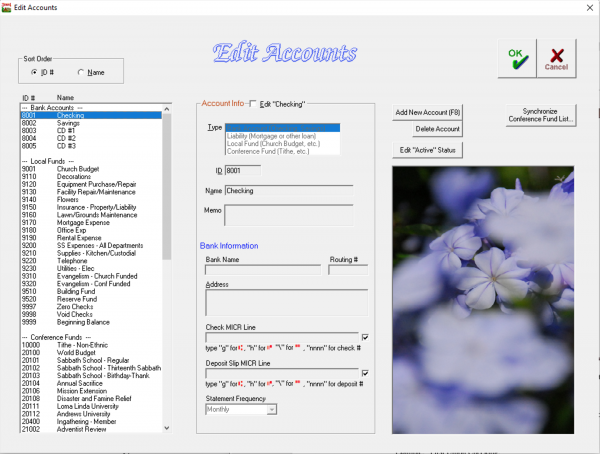
Your next step is to add the accounts you will be using. Many of the most commonly used accounts are already set up in Jewel, such as Sabbath School Expense, Church Expense, and Tithe. If Jewel is being used by your conference, you will also have your most commonly-used conference accounts already in Jewel. You will need to add in your other local accounts. Use whatever account numbering system is best for you. When you first open the Add Accounts screen, you will notice an account (account #8001) named 'Checking' and another (#8002) named 'Savings'. You will need to EDIT these accounts to put in your bank information, and ADD (F8) any other savings or checking accounts your church may be using. It is recommended that you put in your checking and savings accounts first. Then, add any other accounts/funds your church uses that are not already in the accounts list which came with Jewel. The steps for adding a Bank Account are below. For more detailed instructions regarding adding accounts, click here.
Follow these instructions when entering your bank account information:
- Type: Select Bank Account as the account type.
- ID: Select the number you would like your bank account ID to be. Bank account ID numbers should be numbered near the existing numbers, in the low 8000's.
- Name: Type the name of your bank account, including whether it is a checking or savings account. For example: “First Union Checking.”
- Bank Name: Type the exact name of your bank. This is the name that will print out on the checks and must be your legal bank name.
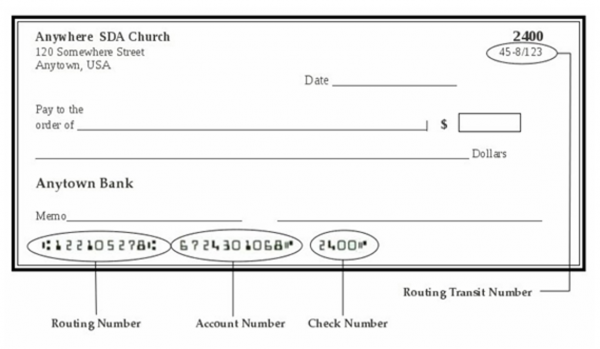
- Routing #: This is "routing transit number" or "fractional bank number" that is sometimes printed in small print on the upper right corner of checks, as a backup to the routing number at the bottom. If your bank still uses this number, enter it here. Otherwise, you may leave it blank.
- Address: Type in your bank's mailing address, using the same number of lines as a normal address label.
- Check MICR Line: This line consists of your account number, routing number, and check number and can be seen on the bottom of your checks in bold black type along with some unusual symbols. Key in the number and symbols (use the guidelines provided to type the symbols) exactly as is seen on your checks, with the exception of the last 4 digits – type “nnnn” instead of the numbers seen on the check.
- Deposit Slip MICR Line: If you plan to print deposit slips from Jewel to take to your bank, copy the MICR line from a pre-printed deposit slip, or ask your bank for the numbers and symbols to enter.
- Statement Frequency: Choose how often you receive a bank statement for this account. Your selection will be used to remind you when to reconcile.
Can I change account numbers and/or account names later?
Yes. But see instructions and cautions here.
Beginning Balances
Your first big decision regarding Jewel setup is whether you will begin entering data starting with the current month, or from January 1. The advantage of beginning Jewel from the beginning of the year is that you will only have ONE set of books to keep up with through the rest of the year. It may take a little more time at the beginning, but it will save you time and trouble in the long run to have all your books for the year in one place. If you decide to start with the beginning of the current month, you will need to refer both to Jewel AND the accounting system you used up to this point. When bringing up reports (specifically year-to-date) you will have to refer to both sets of numbers. You will also need to send out two contribution receipts for each donor at the end of the year - one from Jewel and one from your previous accounting system.
Once you have decided at which point in time to start your bookkeeping, you can enter your beginning balances. Those beginning balances will be the ending balances from the last month of your old system, after remitting to the conference at the end of that month. When selecting accounts, you may either type in the account (by account number OR account name) or you may click the down arrow to the right of the Account field and select from the list. Accounts are listed here alphabetically and then by account number. If you find that you need to edit an account or add another account, you can click on the (+) to the right of the Account field, which will take you back to the "Edit Accounts" page. When you have finished entering the numbers, make sure that the amount in your Bank Account(s) and Local Funds are equal to each other. Jewel will not let you continue if the bank account and local funds totals don’t agree. Jewel also will not accept any Conference fund balances. Jewel assumes that these are remitted each month, so if you have Conference fund balances you will need to remit them before entering your beginning balances, or add them to a new local fund account called Conference Payable. Then when you remit those conference funds, the Conference Payable account will be left with a zero balance. Confirm that your figures are correct by clicking "OK" in the upper right corner of the screen, and then click "Yes" in the following screen.
Edit Names
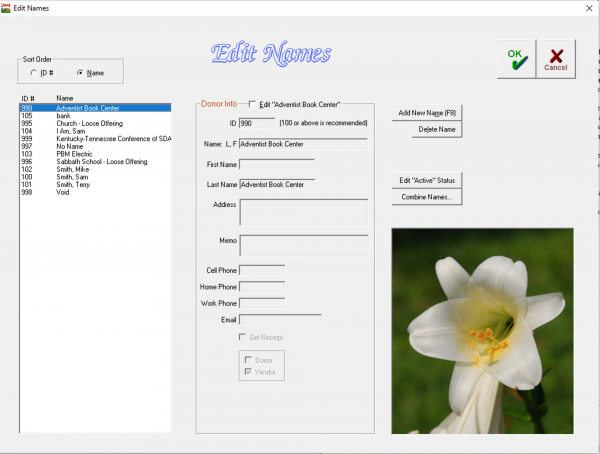
The next step in Jewel setup is to enter the names of your donors (i.e. tithepayers) and vendors (i.e. utility companies). To add a new name, click the “Add New Name” button, or press F8 on your keyboard. Simply fill in the appropriate information for each name. When entering a vendor name, such as an electric company, that does not necessarily have a 'first' and 'last' name, enter the name of the company in the "Last Name" line. Remember you can also add names as you write checks and enter offerings, so don't worry if you don't have a complete list right now. When you have finished entering all the names you wish to add now, click OK, located in the upper right corner.
It is recommended that you enter the donor/vendor names manually so that you don't clutter Jewel with old, unused names. But there is an option to import names from another file. If you already have a list of your church's donors/vendors in Excel, Word, or from your previous accounting program such as Donation Accounting or LUCIS, you can import these names by clicking the "Import Names and Addresses" button. (If you are importing from an Excel or Word file, you will need to save or export the file as a .csv file.) Choose the type of Source file you are importing from, then click "Read from Source". Adjust the options as needed so that the names and addresses import correctly, then click "Import Names and Addresses" to complete the import.
Combining names: If you end up with multiple variations of the same person's name, such as when a name is added with two different spellings, you can merge them. Go to Maintenance → Edit Names and highlight one of the names you want to merge. Then click Combine Names and follow on-screen instructions to complete the merge.
Deleting/deactivating names: If there is no data associated with a name, you can delete it in Maintenance → Edit Names. If there is data, then the name cannot be deleted, but it can be deactivated so that it does not appear when entering contributions or when writing checks. Go to Maintenance → Edit Names and click the "Edit Active Status" button at the right of the window. A box with a check mark beside each name in the left-hand column. Uncheck the names you want to hide. This is useful when donors or vendors have moved, passed away, changed their name, or no longer donate.
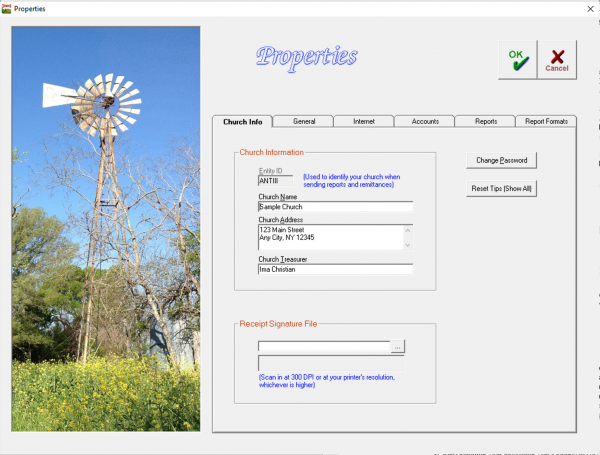
Properties
Fill in your church's address and your name as treasurer. You will also enter your church's Entity ID by clicking on “Select Your Church,” choosing your church from the list, and clicking "OK". (If your church's name is not listed, first check your Internet connection. If that does not resolve the problem, contact your conference's clerk and request that your church be added to eAdventist's database.)
The remaining tabs on this screen contain the Jewel Properties that you can use to customize Jewel for your church's needs. It is recommended that you do not change any defaults at this point, but that you take a few minutes to familiarize yourself with the Properties content. You can change settings later by going to Maintenance → Properties, once you have become more familiar with Jewel. See Part III for a detailed explanation of Jewel Properties.
Budget Allocations
If your church has voted on a budget, now is a great time to enter it. You may edit budget allocations at any time, but any additions or changes will only apply to unclosed months, not to previous months. So if you have a current budget, enter it before doing your month-end closing process. Please see Chapter 5: Budget for detailed instructions.
